Thursday, December 30, 2010

Hats and hair clips. :-)

I've been super busy these last couple of months working on fantastic classes and crops at Capture and making some crafty things for my Etsy shop (soon to be re-vamped with all new items!)

One of the things I've mastered is an adorable crocheted hat pattern from Mandy at Little Birdie Secrets. (LOVE their blog!!) I've already had a couple custom orders from friends. :-) I make mine with a detachable flower that has both a pin AND an alligator clip on the back, so you can change them out and use them in your hair or on your scarf or coat...wherever you want a fun little accent! You can even clip one to a purse!

I plan on adding this item to both my Etsy shop and my Facebook store, so stay tuned! (For a sneak peek, text me at 970-481-3261 and I will send you a pic of one of them!)

I've also been making hair accessories like crazy! I've already listed some in my Facebook store. Click the "Shop Now" tab to see some of them.

You can find my coffee sleeves, cell phone/camera cozies and hair accessories right now at Capture (hats to come soon!)

In the mean time, here are a couple of samples:

Photobucket

Photobucket

Sunday, October 3, 2010

A custom order and a wedding card

This is a sampling of a custom order I made for a customer:

Photobucket

Photobucket


A card I made for a friend's wedding (tulle is all the rage right now and I am LOVING it! :-D )
Photobucket

Thanks for looking! :-)

Tuesday, September 21, 2010

A Halloween and Thank You card

So, since I got the new October 31st Cricut cartridge, I've been itching to make a Halloween card. This was my first design:

Photobucket

It was a bit of a challenge since that cartridge isn't a "feature" one. I basically had to cut the witch out a few different times using different colored paper each time, so I could layer them to make her cape purple and her broom tan.

Then I used Stickles to give it texture and sparkle.


This next card uses a die I bought from MFT's new line, Die-namics. It's the cutest little banner die that cuts banner pieces about 1 inch tall. The letters are from my Lyrical Letters Cricut cartridge.

Photobucket


More to come soon! Thanks for looking! :-)

Tuesday, September 7, 2010

Capture Classes

I've been SUPER busy at Capture, creating some card and page classes!

Here is a look at some of my latest creations!

Upcoming classes:
(To attend a class or purchase a kit, visit www.shopcapture.com. We can ship kits if you are not local!)

Shabby Chic Cards:
Photobucket
Masculine Cards:
Photobucket

Stamp Club Cards:
Photobucket

Coffee & Card Club:
Photobucket

Photobucket


Past Classes (kits available):

Girl Mini Album:
Photobucket

Milestone Birthday Cards:
Photobucket

Stamp Club page layout:
Photobucket
Teen Cards:
Photobucket


Past classes that are sold out (they go fast!):

Pregnancy Pages (This pic shows 2 of the 6 pages that were available):
Photobucket

Single page layouts:
Photobucket

Photobucket

Single card:
Photobucket


These kits and more are available at www.shopcapture.com

Thanks for looking!
:-)

Thursday, September 2, 2010

I'm back from my summer hiatus! ;-)

This summer was BUSY for us! Too busy to craft, let alone blog!

But now that Fall is almost here it's time to get back into the swing of things! :-)

I've been happily working on a bunch of new projects that I plan on sharing with you over the next few weeks! And I've been improving some old projects as well (new coffee sleeve designs and crocheted embellishments!)

For now I'll show you my latest fun project: stamped tile coasters!

This is a quick and inexpensive gift item that's super fun (and easy!) to make!

You'll need:

-Tumbled Marble Coasters (available at Lowes in boxes of 9. Couldn't find any at Home Depot. Go through the box first to make sure there are no broken ones!)

-Felt or cork with a sticky back. (This is for the little "feet" on the bottom of coasters to keep them from scratching surfaces.I found mine at Lowes.)

-Stazon ink (available at Capture Scrapbooking)

-Various fun stamps in whatever pattern you like! Acrylic or wood both work just fine, but make sure you have an acrylic block for your stamp if you are using acrylic stamps!

-Colored permanent markers such as Sharpie's (optional)


Instructions:

First, wash your tiles to get rid of the chalky dust and let them air dry.

Next, choose your stamp(s) and how you'd like them to be arranged on your tile.

Load up your stamps with your Stazon ink and start stamping! You'll want to be careful that your stamp doesn't slip (those tiles can be slippery!) and ruin your image. Lift it straight up when you are done to prevent smudging.

Let it dry thoroughly.

Once the ink has dried, you can color it in with your colored markers.

When you are done, you'll want to bake them in a 350 degree oven for about 20 minutes to set the ink. This will help keep it from fading over time.

Once they have cooled, put the felt or cork backing or "feet" on them and you are done! Easy as that!

Here is a set I made using a now retired stamp set from Close To My Heart:

Photobucket
A closer view:
Photobucket

Photobucket

The felt feet I used:
Photobucket

Thanks for looking and check back soon for more posts and contests!

Happy Crafting!
;-)

Monday, June 7, 2010

June Challenge

This month's challenge is an "Inspiration" challenge!

June is a popular month for weddings, and in honor of that, I found a great wedding cake pic to inspire you!

Photobucket

I absolutely ADORE this cake!

Anyone who knows me knows I LOVE black and white color combos. And I love scalloped edges as well. And the small dots incorporated into the scalloped edge and borders. And the beautiful flowers!! (I could go on!)

So as soon as I saw this pic I knew I had to use it as a fun inspiration challenge!

Here is my creation:

Photobucket

I used a background stamp from CTMH to mimic the polka dots on the cake. I also used Stickles in Black Diamond and Tiara to highlight the circle, kind of like the dotted icing does on the scalloped edges.

I also added a large flower, and kept the colors simple, just like the pic of the cake.

So, hopefully you'll get inspired by the pic I've chosen and come up with something fun too, be it a card, a layout, or any other paper crafting creation!

Want to see what you're playing for?

This month, I'm giving away a set of Prima Pebbles!

Photobucket

These little self-adhesive "pebbles" are perfect in the center of flowers and make great accent pieces all by themselves! There are many different styles to choose from, available at Capture.

This set has a swirl pattern in fun summer colors, perfect for any occasion! :)

To participate in the challenge, just make a paper crafted (or digital) creation based on the inspiration pic above, and upload the URL to your pic to the Mr. Linky widget below:


NOTE: Starting this month, I'm making things easier for everyone by incorporating the challenge to the Crafty Kitty Facebook page!

Now there are TWO ways to upload your pics! You can use the Mr. Linky widget, or simply upload your pic on Facebook to my Fan Page to be submitted for the challenge! To post your photo(s) on the Facebook fan page, just visit my page Crafty Kitty and upload your pic directly from your computer on my wall. Be sure to include your name and the date, and a link to your blog if you have one!!

This challenge contest ends Sunday, June 27th at Midnight!

Thanks for playing!

:-)

Tuesday, June 1, 2010

A Congratulations card (and the May Challenge winner!)

This is a card I made for our babysitter, Amy for graduation. She recently moved away (she's joining the Peace Corp, and right now, she's touring Europe. How cool is that?!?) So, sadly for us, it was also somewhat of a "goodbye" card. :(

Photobucket

For the circles, I used stamps from Technique Tuesday and Basic Grey. The sentiment and stamped flower are from My Favorite Things (now retired).

The white flower is cut from felt and tissue paper on my Cuttlebug. (Man I love that thing! I'm making felt hair barrettes and embellishments next!)

The ruffle is just a crinkled strip of paper glued down with Terrifically Tacky Red Line Tape (available at Capture) and covered at the top with some black ribbon.

Now on to the challenge winner......

Congratulations to Buffie (i.e. Crafty Guam Girl) for winning the May Challenge! She gets a custom made cell phone/camera cozy! Check out her cute card:

Photobucket

Stay tuned for the newest challenge! I'm changing things up a bit and (hopefully) making it easier for more people to participate. More details to come!

;-)

Sunday, May 30, 2010

Clear Acrylic Cards

Join me this Wednesday, June 2nd at Capture Scrapbooking to learn how to make these 4 fun CLEAR cards!

Photobucket

They're so fun you almost won't want to give them away! ;-)

The class is from 6:30-8:30, Wednesday, June 2nd at Capture in Fort Collins, CO.

$15 for 4 cards.

Can't make it to the class? Buy a kit instead! We will even ship it to you!

Tuesday, May 18, 2010

Fun new storage cases AND paper flowers tutorial!

So, for the last year or so, I've had my eye on this SUPER cute storage container at Capture. I finally decided I needed it. I wasn't sure what I was going to use it for at first, but then I remembered that my teensy mini tote was literally BURSTING with fun embellishments (like rhinestones, buttons and small acetate flowers and swirls) So I bought it to relieve my mini tote (lol). :)

Photobucket

The top opens up to reveal a pretty deep open storage compartment, perfect for all my sticky buttons and "bling".

Photobucket

Photobucket

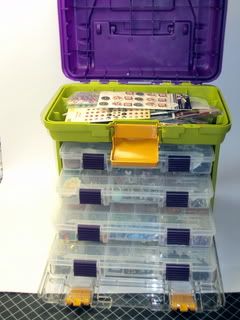
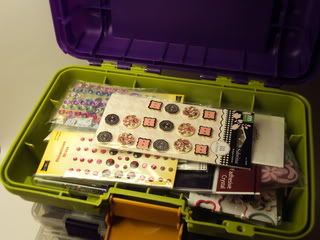
The 4 "drawers" are separate containers that pull out, perfect for my collection of brads!

Photobucket

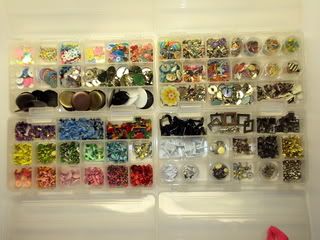
(and yes, I organized them all by color & style. I had to. It's my OCD. Everything I use...in the crafting world anyway...has to be colorized. :) Clockwise from the top, its: jumbo brads and loose buttons & baubles, specialty brads, including sparkle,
rhinestone, flower shaped and fabric, neutral and metallic brads, and solid color brads.)

Needless to say, this is my FAVORITE new toy! Want one of your own? There's one left at Capture, so hurry in today!

Next up: my Stickles container.

You might think one could manage with a somewhat small container for these wonderful and versatile little tubes of glitter glue.

Well, you'd be wrong.

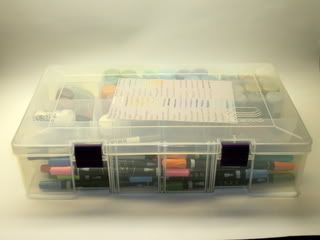
Seeing as how I own oh, about FORTY bottles of Stickles (what? That's not normal??) I needed a large container.

AND, I wanted to be able to store them upside down so they didn't get those annoying air bubbles that threaten to ruin your lovely projects.

So I bought this hugemongous monstrosity, known as my "color box". (I call it that b/c it's so big, I put all of my markers, Smooch Spritz sprays (available at Capture!), colored flock and mini viles of glitter in there, as well as all my Stickles. So basically everything I need to color my world. :-) Well, everything except the dozens of ink pads I have, but that's another post, lol.)

Photobucket

Photobucket

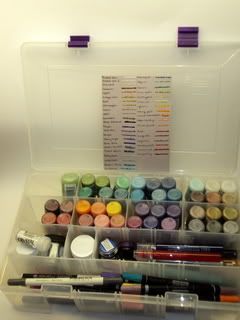
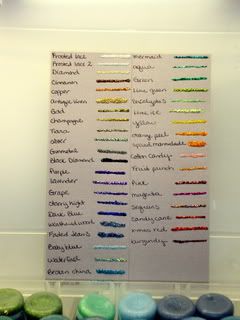
What is that funny looking list in there you say? Welp, my OCD is so bad, I had to make a list of my Stickle colors and an example of what they looked like dry. So I made one. Call me crazy, but anyone who scrapbooks with me always uses my handy little list so......  :P

Photobucket

This wonderful storage container is also available at Capture, along with a variety of different size containers.

After I had organized all of my glitters and sprays and whatnot, I felt the need to create. So I made some more paper flowers, including a new style I found over at Little Birdie Secrets!

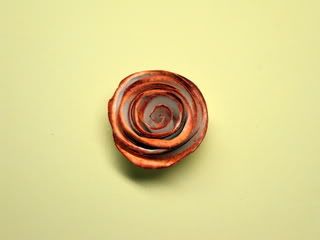
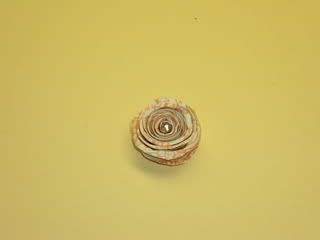
The first two are paper roses (find the tutorial for these here). I used white paper heavily inked in red for the first one, and then stamped the 2nd one and sprayed it with white Smooch Spritz  to give it a pearly shimmer. I also added a rhinestone to the center of the 2nd rose. They look better in real life than they do in these pics, but...what can ya do?
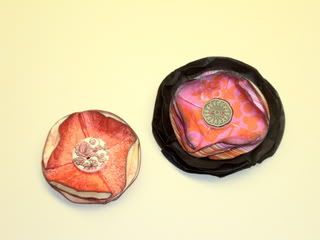
Photobucket
Photobucket

Next, I made some Box Top Flowers from Little Birdie Secrets. I didn't have a way to make a scalloped circle at the time, so I just made them with plain circles, but I liked the way they came out. I also sprayed one of them with my red Smooch Spritz. (Man that stuff is fun!)

Photobucket

That's all for now. I hope you try making the flowers too! They're addictive!;-)

Thanks for looking!

Tuesday, May 11, 2010

Upcoming card classes at Capture

Join me this weekend at Capture Scrapbooking (Fort Collins, CO.) for some fun card classes!

Saturday, May 15th from 1:00-3:00pm: Distressed Cards!

I'll teach you some great paper distressing techniques (including paper ruffles and a new paper flower!)while we make four gorgeous cards, perfect for any occasion!

$12

Photobucket

***********************************************************

Sunday, May 16th, Noon-2:00pm: Masculine Cards!

Create four fun cards for the man in your life! Perfect for birthdays, Father's Day, or just because! And since the sentiments are created with stamps, you can switch them out to make one for your brother, husband, father or son (and even in-laws!)

$12

Photobucket

Sign up in store or online today!

Not local to the area or can't make the class? Buy a kit instead! Everything is pre-cut and ready for you with pictures included. All you have to do is glue it down! We can even mail it to you! :-)

Thursday, May 6, 2010

May Challenge: Sketch Contest!

Are you ready for the new May Challenge?!
It's fun and simple. :-)

It's a sketch! :)

Photobucket

I haven't had time to create a card based on this sketch yet, but it's from the Mojo Monday blog, and there are a TON of great projects posted there using this sketch! Check it out for some inspiration!

You aren't limited to creating a card either! This sketch would be cute on a layout too! Feel free to think outside the box! ;-)


Want to know what you're playing for?

This month, the winner will receive either a free camera/cell phone cozy OR a free coffee sleeve! You choose which item and what colors you'd like! (Pick any color of the rainbow...I pretty much have them all! You're not limited to the colors shown here. ;-)

Photobucket


So, upload your pics to the Mr. Linky widget here:


This contest will end Monday, May 31st, so make sure you get your pics entered by then!

Not sure how to share your pics for the contest? If you don't have a blog of your own, you can upload your pics to almost any photo hosting website (like Flickr or Photobucket or Shutterfly) These sites will create a URL for your photo. Once you have the URL, copy and paste it into the Mr. Linky and you're done!
(If uploading from your blog, make aure you ulpoad the URL to the POST which contains your pic, not the URL to your blog in general.)
If you need further assistance, please email me or send me a message on Facebook. :)


Congratulations to last month's winner, Jenny Petrillo! She made an absolutely adorable card using three different types of "shine"! :-) Check it out! (I think my fav. part is the clear acetate flower!) :

Photobucket


Thanks for playing, and happy crafting!
;-)

Friday, April 23, 2010

Estes Park Crop Weekend, April 2010

So, last weekend was the first Estes Park Crop Weekend, and it was a BLAST!!

Our house was perfect for a crop, with TWO living rooms and a nice kitchen & dining room, (plus 3 full bathrooms - perfect for a house full of women!)

We had some GORGEOUS views too!

This is the view from our back porch on Saturday morning:

Photobucket
Photobucket

Photobucket

The fog was rolling in, and you could see the tip of the mountain poking through the top of the fog:

Photobucket

Photobucket


It rained later that afternoon (perfect scrapbooking weather!) ;-)

Here's the gang (minus Suzanne) at dinner:

Photobucket
Photobucket


Scrapbooking fun:

 Photobucket

Photobucket

Photobucket


The weather on Sunday was absolutely PERFECT and the mountains looked BEAUTIFUL!!!

Photobucket

Photobucket

Photobucket

Photobucket


Hello Elk! (we saw SO much wildlife during our stay!)

Photobucket

On the way down the mountain, traffic came to an unusual stop:

Photobucket


What's holding things up??

A herd of BIG HORN RAMS!! SO COOL!!! (For those not familiar with driving up the mountain, this is a pretty rare sight!)

Photobucket

Photobucket

Photobucket

Oh, and this is what I got done over the weekend:

(These first 3 layouts were actually created by Jody at Capture. She designed them for a class back in November and I bought one of the kits. I just saved them for when I had time to scrapbook, then added my pics!)

Photobucket


Funny story about this layout...After I had finished laying everything out and then gluing it all down, I bumped my tool tote and knocked a dark brown ink pad FACE DOWN on the top, right where the white part is! I had to come up with something to hide it, so I made those two big snowflake embellishments at the top.) Whew! Crisis averted! ;-)

Photobucket

Notice the little red rhinestone on "Rudolph's" nose. :-)

Photobucket

Denver Zoo Lights:

Photobucket


I added Glossy Accents to the word "Wild":

Photobucket


Photobucket

For these snowflakes, I ran them through my Cuttlebug to emboss them (I used the Swiss Dots embossing folder) then I Stickled the dots with Diamond Stickles.

Photobucket


Photobucket


This snowflake shows some of the bling-y, Stickle-y goodness I have going on. What's a snowflake without Stickles?!? I just wish they photographed better. They're so pretty in real life!

Photobucket


Photobucket


My favorite layout of the weekend:

Photobucket

Photobucket

Photobucket

BIG thanks to all the ladies who came! I had such a good time! Let's do it again SOON! (October maybe??)

Thanks for looking!
;-)
Related Posts with Thumbnails